This Buttercream Rainbow Cake has a hidden Rainbow buttercream centre it is also decorated with the cutest Rainbows.
This is a bit of a different post compared with my normal recipes. I am going to share a step-by-step guide to making this beautiful rainbow cake.
I have been experimenting a little bit lately with decorating my cakes and I have been having so much fun experimenting. Recently bought a lot of new cake decorating equipment which I will go through in a new post, but for now I hope you enjoy this Buttercream Rainbow Cake.
Remember if you make any of my recipe share them on social media by tagging me or using #aspoonofvanilla.
Jump to Recipe
Let’s Start with the Cakes
Okay, so for the cakes I used 4 Vanilla Cakes. I increased the recipe for my Vanilla Cake to add in here….
You could make the cake a three-layer if you prefer but I just prefer the height of four layers for this cake. You could also make this cake chocolate using my Chocolate Drip Cake, Rainbow Cake or Cookie Dough Cake it is completely up to you.
Once you have baked your four cakes leave them to one side to cool completely.

Rainbow Buttercream Centre
So, for this cake it may seem like you have a huuuge amount of buttercream but don’t worry because we are going to be splitting it into individual bowls to make lots of different colours for this cake.
To make the buttercream just mix together the Unsalted Butter, Icing Sugar and Vanilla Extract. I wouldn’t recommend using a baking spread like Stork for your buttercream as it will just make your buttercream really soft and sloppy, and it won’t be able to hold up your cake.
Related Posts
For the buttercream you need to split it into seven bowls (sorry! There is a lot of washing up with this cake but trust me it is worth it!). The difficulty with this part is that you don’t need the same amount in each bowl. You will need enough dark blue to decorate the outside of your cake with you will then need a fair bit of red as you are going to pipe this around the edge of your cake when stacking them to create a rainbow in the centre.
For your rainbow colours you will then need a little bit less of each colour. So, you will need the most amount of red, then yellow, orange, purple and turquoise.
You will also need to leave some buttercream white for the crumb coat and clouds, the amount you want to leave white is completely up to you. I used the white to look like clouds on my rainbows and I then also decided to pipe the top of the cake to look like rainbows too but as always this is completely optional.

Colouring your buttercream
To colour my buttercream I used Pro Gel Food Colouring. I would recommend using gel food colouring as you don’t need a lot to get a really vibrant colour. For this cake, I used red, yellow, orange, purple and turquoise for the rainbow and for the crumb coat and sides/top of the cake I used blue food colouring.
For this part of the cake place all the colours into piping bags with a large round nozzle. You won’t use all of the buttercream so any leftover just pop back into your bowls for later.
Stacking the Cakes
Place your first cake onto your cake board. Using the red buttercream pipe around the top edge of the cake. Next to the red now pipe a circle of orange, then yellow, purple and when you reach the centre pipe the blue.
Now you will see why we need more red buttercream as opposed to turquoise as the red has to go all the way around the outside edge of the cake whereas the turquoise is just a tiny little circle in the centre.
You should now have a rainbow on top of your first cake. Place your next cake on top and repeat the process until your cake is stacked.
Using the white buttercream go around the sides of your cake and fill in any gaps. Using your cake smoother smooth the buttercream out. Don’t worry if you can still see the cake through the buttercream this is just our crumb coat, we will completely cover the cake with the blue buttercream.
Place the crumb coated cake into the fridge for around 30 minutes or until the crumb coat is completely firm.

Decorating the Cake
Once your crumb coat has firmed up it is time to decorate!
Using your blue buttercream pipe around the side and top of the cake. Don’t worry this doesn’t have to be neat and it doesn’t have to be perfect as we are just going to smooth it out.
Smooth the buttercream first with a palette knife. This will take a little of the excess buttercream off before we use our cake smoother.
Once the buttercream has been smoothed slightly with your palette knife go around the sides of the cake with your cake smoother and smooth. If there are any gaps fill these in with buttercream and smooth again.
If any of the buttercream comes off the cake just pop this back into the bowl.
To finish the top edges of the cake using an angled palette knife gently smooth the edges back into the centre of the cake. Clean your palette knife every time after smoothing as you don’t want to put any of the buttercream back onto the cake.
Pop the cake back into the fridge for around 30 minutes or until the buttercream is firm.
While your cake is chilling put your rainbow buttercream into piping bags with a small star nozzle and leave to one side. If you need to add your white buttercream to a piping bag with a large round nozzle.

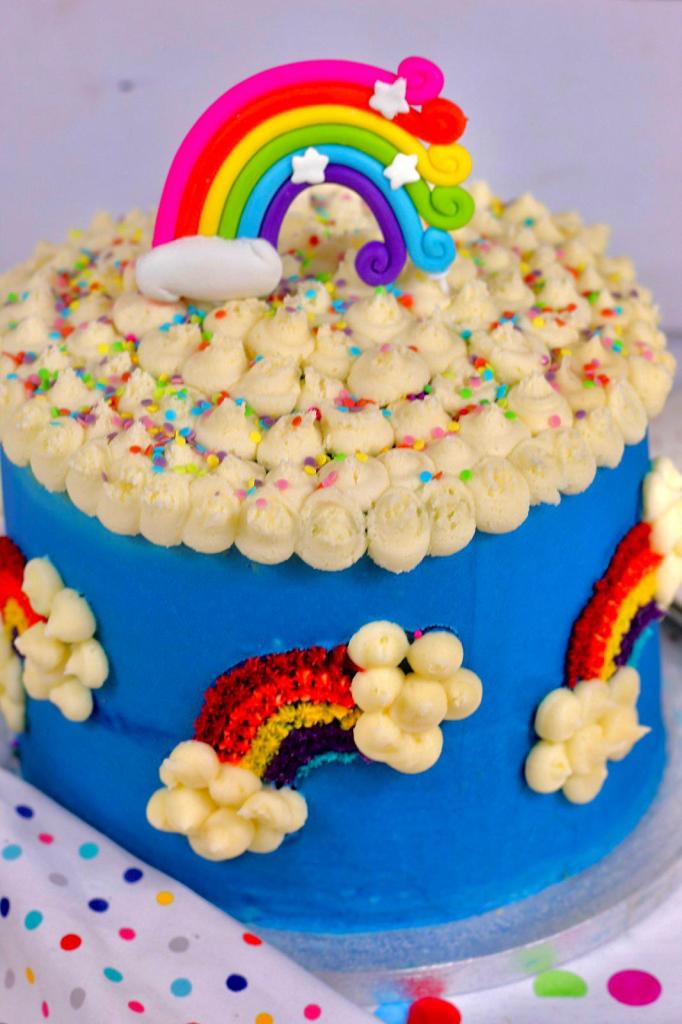
Decorating with Rainbows
To make sure I got the perfect rainbow I used a rainbow cookie cutter and pressed it gently into the sides of my cake to get the imprint of the cutter on the cake. Repeat this all the way around the cake.
Now using your red buttercream pipe along the outline, the rainbow cookie cutter has given you.
Once you have piped the red buttercream continue piping with the orange, yellow, purple and turquoise.
Once you have piped all your rainbows following the outline of the cookie cutter using your white buttercream in a piping bag with a large round nozzle pipe some little round splodges on to represent the clouds. The cookie cutter I used had the outline for the clouds which made it slightly easier.

Decorating the top
So, you all know how I love to be a little bit OTT, so I decided to finish this cake off by piping the white buttercream over the top of the cake.
I finished it with some rainbow confetti sprinkles and a rainbow cake topper.
Alternatives
You can make this cake using any cookie cutters on the outside.
Also, you can use any colours for the rainbow you want.
Pin it For Later!


Buttercream Rainbow Cake
Ingredients
You Will Need…
- 4 8" Vanilla Cakes
- 2 kg Icing Sugar
- 1 kg Unsalted Butter
- 2 tsp Vanilla Extract
- 5-6 tbsp Whole Milk
- Red, Yellow, Orange, Purple, Turquoise, Blue Food Colouring
- Sprinkles
Instructions
To Decorate the Cake
- Mix together the icing sugar, butter and vanilla until it is fully incorporated. If you find the buttercream is still too thick add 1tsp of milk and mix again. Repeat until the buttercream reaches the desired consistency.
- Split the buttercream between 7 bowls. You will need more blue to decorate the outside of the cake, white for the clouds and you will also need slightly more red buttercream.
- Add the food colouring a little at a time. You need 1 bowl of red, yellow, orange, purple, turquoise, blue and leave the last one white.
- Put the red, yellow, orange, purple and turquoise into large piping bags with either a large round nozzle or if you are using disposable piping bags you can just snip the tip of the piping bag off. .
- Place your first cake onto your cake board/serving plate. Pipe the red buttercream around the edge of the cake, then pipe the yellow next to it, then orange, purple and blue, moving closer to the centre of the cake with every colour until the blue is in the centre. Stack your remaining cakes with the same technique. Once all your cakes are stacked put any left-over buttercream back into their bowls.
- Put the white buttercream into a piping bag with a large round nozzle and pipe around the outside of the cake. Smooth the buttercream using a cake smoother. Don’t worry if you can still see the cake through the buttercream this is just our crumb coat.
- Once your buttercream is smooth, pop the cake in the fridge for 20-30 minutes or until the buttercream has hardened.
- Once your buttercream has hardened, remove the cake from the fridge and pipe the blue buttercream around the sides and top of the cake. Smooth with your cake smoother. If there are any gaps fill these in using the buttercream and smooth again.
- Once your blue buttercream is completely smooth, using a rainbow cookie cutter go around the side of the cake and gently mark out where you want to pipe your rainbows. You will use these markings as a guide.
- Put your red, yellow, orange, blue and purple buttercream into piping bags with a small star nozzle. Starting with the red pipe around the top of the outline of your rainbow and work your way to the centre using your different colours.
- Once all your rainbows have been piped, pop your white buttercream into a piping bag with a large round nozzle and pipe the clouds around the edge of the rainbows. I done this by piping some splodges.
- Pipe the white buttercream onto the top of the cake to resemble the clouds and finish with some sprinkles and a rainbow cake topper.
If you do have any questions about this Buttercream Rainbow Cake or any other recipes on my blog you can contact me either by sending me a DM on social media or an email. You can find all my details on the right-hand side of this page.


I am always in awe of the cake you can make! I mean this takes surely the top tier, love the colours and decorations! The inside is even better! x
Thank you so much lovely!
Thank you!
This looks so cute! I know someone who would absolutely love this rainbow-themed cake as much as me — thanks for sharing!
Thank you!
This rainbow cake looks delicious, I absolutely love butter cream! x
Lucy | http://www.lucymary.co.uk
Thank you! Me too hahah!
Thank you! I hope you enjoy it! If you do make them please tag me or use #aspoonofvanilla so I can see all the deliciousness.
Thank you!
This looks so vibrant! I love all the rainbows and that you can see even more rainbow colors when you cut into the cake. What a fun creation!
Thank you!
Your Rainbow cake looks so lovely and sweet to eat. I haven’t been eating rainbow cake for quite a long time. Thank you for sharing.
Thank you!
Aww thank you so much lovely!
Thank you so much lovely!
That’s a pretty cake you have there. Now that our nation has locked us down a second time, I must make baking my lockdown goal for the umpteenth time.
Thank you! I hope you enjoy it! If you do make them please tag me or use #aspoonofvanilla so I can see all the deliciousness.
This is such an adorable cake!! Thank you so much for sharing the recipe and how to decorate it!
Thank you!
Oo, this looks incredible! The decoration and colours are beautiful too x
Thank you!
Thank you! I hope you enjoy it! If you do make them please tag me or use #aspoonofvanilla so I can see all the deliciousness.
I love anything with buttercream! This cake looks amazing! x
Lucy | http://www.lucymary.co.uk
Thank you very much!
Oooh, rainbow cookies sound delicious!
Lovely cake! This is one my daughter would want me to make. She loves rainbows! I definitely agree about gel food coloring. The colors are a lot more vibrant than liquid food coloring. I always use it for frosting, especially. 🙂
Ahh, I am sure she would love it if you do make it for her! You are right the colours are so much more vibrant I don’t think I could use any other type of food colouring.