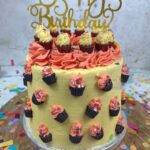
My 28th Birthday Cake
My 28th Birthday Cake! A 6” Vanilla Cake with mini cupcake decorations. It’s my birthdaaaaay! Or it was on Wednesday, and to celebrate I had to make my own birthday cake.
Servings: 16 Servings
Ingredients
For the Birthday Cake
- 350 g Unsalted Butter or Stork
- 350 g Caster Sugar
- 350 g Self-Raising Flour
- 7 Large Eggs
- 1 tsp Baking Powder
- 1 tsp Vanilla Extract
For the Buttercream
- 500 g Unsalted Butter
- 1 kg Icing Sugar
- 1 tsp Vanilla Extract
- 3-4 tbsp Whole Milk (optional)
- Yellow Food Colouring
- Pink Food Colouring
- 180 g Peanut Butter Cups
- Black Lustre Dust
- Pink Lustre Dust
- Sprinkles
Instructions
To Make the Birthday Cake
- Preheat the oven to 170C (150C Fan). Line two 6” cake tins with greaseproof paper and leave to one side.
- In a large bowl, whisk together the sugar and butter until light and fluffy.
- Add in the flour, eggs, baking powder and vanilla and whisk until all combined.
- Split the mixture between the two cake tins. You should have approximately 700g in each tin.
- Bake in the oven for 45-50 minutes. You will know they are ready when they are golden brown and springy to the touch.
- Leave them to cool in the cake tin for 15-20 minutes and then remove and put them on a wire rack to cool fully.
To Make the Buttercream
- Beat the butter for around 5-10 minutes until soft and pale in colour.
- Add in the icing sugar and vanilla extract and mix until completely combined. If you find the buttercream is too thick add a tablespoon of milk and mix again. Repeat until the buttercream is the desired consistency.
- Remove 250g of the buttercream and pop it into a separate bowl. Add the pink food colouring a little at a time, mixing in between each addition until you have reached the desired colour. Cover with cling film and leave to one side.
- With the remaining buttercream add yellow food colouring a little at a time. Mixing in between each addition until you reach the desired colour.
Putting it All Together
- Split each cake into three separate layers so you should have six layers in total.
- Place the first cake onto your cake board and spread the yellow buttercream on top. Stack your next cake on top and spread over the buttercream. Repeat until the cake is fully stacked.
- Pipe or spread the buttercream onto the sides of the cake to fill in any gaps.
- Using your cake smoother smooth the sides of the cake. Don’t worry if you can see the cake through the buttercream, this is just the crumb coat. We will cover the cake soon.
- When there are no gaps in your cake pop it into the fridge until the buttercream has hardened.
- While you are waiting for the buttercream to set, cut half of your Peanut Butter Cups in half and dust over the black lustre dust.
- Dust 12 full peanut butter cups with the ruby lustre dust and leave them all to one side.
- Once the buttercream has hardened, pipe the remaining buttercream around the sides of the cake
- Using your smoother, smooth around the sides, if there are any gaps fill these with the buttercream and continue to smooth around the sides until the cake is smooth. You will most likely take some of the buttercream off the cake if you do pop this back into your bowl.
- Gently place the halved peanut butter cups around the side of the cake.
- Put the pink buttercream into a piping bag with a small piping nozzle and pipe buttercream onto the top of the peanut butter cups around the side of the cake.
- Add the remaining pink buttercream into a piping bag with a 2D Star Nozzle and pipe swirls onto the top of the cake.
- Add the full peanut butter cups to the top of the swirls.
- Using any leftover yellow buttercream add this to a piping bag with a small star nozzle and pipe swirls onto the top of the peanut butter cups.
- Add sprinkles to the cake and finish with a dusting of lustre dust and a cake topper.
Notes
- This cake will last for 3+ days.